Introduction
In SharePoint 2010 you now have the ability to use LINQ syntax to fetch items from your lists instead of using the "traditional" approach of CAML queries. (Including SPSiteDataQuery and SPQuery objects)In this article I will give you a brief introduction to how you can get started using LINQ queries in SharePoint, also known as LINQ to SharePoint.
Basics of LINQ?
As a prerequisite to this article, I’m going to imply that you know what LINQ is and how to write basic LINQ queries in any .NET application already. I’m not going to dive into the details about LINQ or the syntax itself here – please see MSDN for that!LINQ to SharePoint!
In order to work with LINQ in SharePoint 2010, we need use a tool called SPMetal.exe which resides in the 14bin folder. This tool is used to generate some entity classes which Visual Studio 2010 can use to get IntelliSense, and allows for LINQ-based queries to be performed on your lists.Noteworthy:
- LINQ to SharePoint queries are translated to proper CAML queries
- CAML queries are in turn later translated to SQL queries
SPMetal.exe
Using the tool called SPMetal, we generate our entity-classes that are needed to perform these object oriented queries toward our SharePoint server.These are the required steps to get hooked up:
- Launch a cmd-window and navigate to C:Program FilesCommon FilesMicrosoft SharedWeb Server Extensions14bin
- Run the following command to utilize the SPMetal.exe tool with the following syntax:
- SPMetal.exe /web:http://yoursite /code:C:YourEntityFile.cs
- Example:
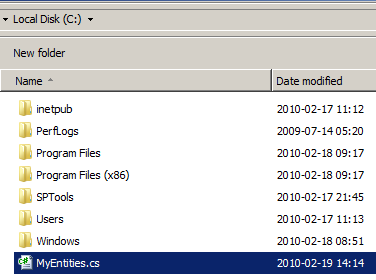
- Now navigate to C: (or wherever you chose to output your file) and make sure the file has been generated:
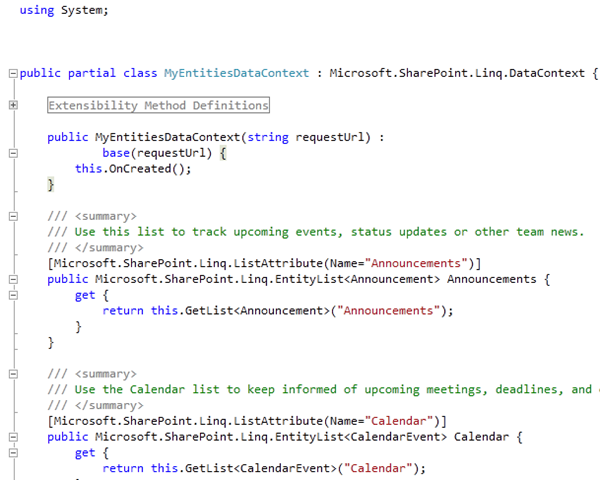
- Open up the file and take a look at the content that SPMetal now have provided us with:
Note that the class name is now MyEntitiesDataContext. It’s based on the name you specify as your code file in the SPMetal.exe command line tool. If you were to use /code:C:Awesome.cs instead, it would generate a class called AwesomeDataContext.
Visual Studio 2010 – Let’s create a sample Web Part that utilizes LINQ to SharePoint
In this sample I will create a simple Web Part that will use LINQ to SharePoint syntax to fetch some information from the Announcements list. A basic sample I use in my training classes as well, and should be fairly easy to grasp!- Create a new project (I’m going to create a new Visual Web Part project)
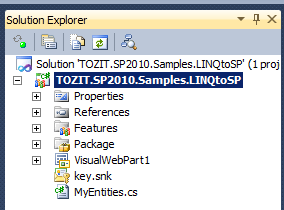
- Import your DataContext-file by choosing your Project -> Add -> Existing Item:
- Specify your file (mine is called MyEntities.cs):
- Make sure it’s properly placed in your project structure – then we’re good to go:
Add proper references
Now in order to use LINQ to SharePoint, you also need to reference the Microsoft.SharePoint.Linq assembly. Point to references, right-click and choose "Add Reference" and select the Microsoft.SharePoint.Linq.dll file: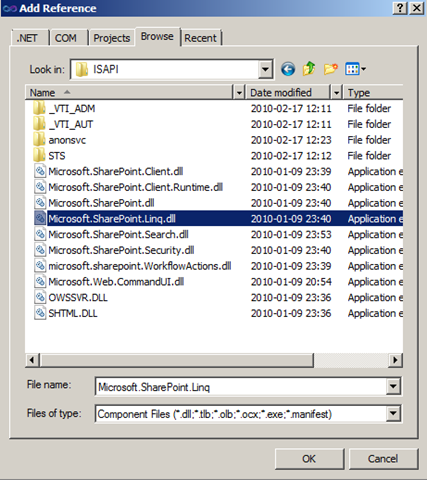
In your code, reference the assemblies:

Ready to code?
What you should’ve done up until now is this:- Generate your entities using the SPMetal.exe tool
- Reference the newly created file from your SharePoint project
- Make sure you’re using the proper references for System.Linq and Microsoft.SharePoint.Linq
- Be ready to code

Code!
In my example I will have a Visual Web Part that will use LINQ to SharePoint to fetch all Announcements from my Announcement-list and work with those results. If you want to see the entire project, look at the bottom of this article where you can download it.
IntelliSense!
While you code your queries using LINQ to SharePoint, you will now have access to IntelliSense, which you did not have with CAML queries:
I’m going to leave it at that – very (very) easy to get started with LINQ to SharePoint, and all you really need to know is to start using the SPMetal tool to generate your entity classes and hook’em up with Visual Studio to start coding.
The two following questions are quite popular in my SharePoint 2010 developer training classes, so I ought to answer them right here.
- "What does LINQ to SharePoint really do?"
- "Can I see the CAML query generated by the LINQ to SharePoint query?"
What CAML lied behind my LINQ to SharePoint query?
In order to fetch the CAML query that lies behind your LINQ query, all you need is to work with the .Log object of your DataContext.See this simple example, which simply outputs the CAML query to an XML-file for easy reading:

This will essentially generate the following content in the file C:MyEntitiesDataContextQuery.xml:
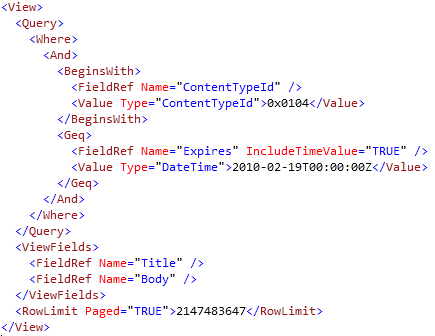
As you can see, the LINQ to SharePoint query is automatically turned into a CAML Query.
Summary
Yep, all you need is the .Log property to fetch the CAML query from your LINQ statement. In my sample I’m outputting it to a file called C:MyEntitiesDataContextQuery.xml.You could of course output it in any other way you want – not just a physical file on the file system. The Log property is of the type TextWriter.
No comments:
Post a Comment