Thursday, 14 June 2012

A Complete URL Rewriting Solution for ASP.NET 2.0

This article describes a complete solution for URL rewriting in ASP.NET 2.0. The solution uses regular expressions to specify rewriting rules and resolves possible difficulties with postback from pages accessed via virtual URLs.

Why use URL rewriting?

The two main reasons to incorporate URL rewriting capabilities into your ASP.NET applications are usability and maintainability.

Usability

It is well-known that users of web applications prefer short, neat URLs to monstrous addresses packed with difficult to comprehend query string parameters. From time to time, being able to remember and type in a concise URL is less time-consuming than adding the page to a browser's favorites to access later. Again, when access to a browser's favorites is unavailable, it can be more convenient to type in the URL of a page on the browser address bar, without having to remember a few keywords and type them into a search engine in order to find the page.
Compare the following two addresses and decide which one you like more:
  1. http://www.somebloghost.com/Blogs/Posts.aspx?Year=2006&Month=12&Day=10
  2. http://www. somebloghost.com/Blogs/2006/12/10/
The first URL contains query string parameters to encode the date for which some blog engines should show available postings. The second URL contains this information in the address, giving the user a clear idea of what he or she is going to see. The second address also allows the user to hack the URL to see all postings available in December, simply by removing the text encoding the day '10': http://www.somehost.com/Blogs/2006/12/.

Maintainability

In large web applications, it is common for developers to move pages from one directory to another. Let us suppose that support information was initially available at http://www.somebloghost.com/Info/Copyright.aspx and http://www.somebloghost.com/Support/Contacts.aspx, but at a later date the developers moved the Copyright.aspx and Contacts.aspx pages to a new folder called Help. Users who have bookmarked the old URLs need to be redirected to the new location. This issue can be resolved by adding simple dummy pages containing calls to Response.Redirect(new location). However, what if there are hundreds of moved pages all over the application directory? The web project will soon contain too many useless pages that have the sole purpose of redirecting users to a new location.
Enter URL rewriting, which allows a developer to move pages between virtual directories just by editing a configuration file. In this way, the developer can separate the physical structure of the website from the logical structure available to users via URLs.

Native URL mapping in ASP.NET 2.0

ASP.NET 2.0 provides an out-of-the-box solution for mapping static URLs within a web application. It is possible to map old URLs to new ones in web.config without writing any lines of code. To use URL mapping, just create a new urlMappings section within the system.web section of your web.config file and add the required mappings (the path ~/ points to the root directory of the web application):
<urlMappings enabled="true">
   <add url="~/Info/Copyright.aspx" mappedUrl="~/Help/Copyright.aspx" />
   <add url="~/Support/Contacts.aspx" mappedUrl="~/Help/Contacts.aspx" />
</urlMappings>
Thus, if a user types http://www.somebloghost.com/Support/Contacts.aspx, he can then see the page located at http://www.somebloghost.com/Help/Contacts.aspx, without even knowing the page had been moved.
This solution is fine if you have only two pages that have been moved to other locations, but it is completely unsuitable where there are dozens of re-located pages, or where a really neat URL needs to be created.
Another possible disadvantage of the native URL mapping technique is that if the page Contacts.aspx contains elements initiating postback to the server (which is most probable), then the user will be surprised that the URL http://www.somebloghost.com/Support/Contacts.aspx changes to http://www.somebloghost.com/Help/Contacts.aspx. This happens because the ASP.NET engine fills the action attribute of the form HTML tag with the actual path to a page. So the form renders like this:
<form name="formTest" method="post" action="../Help/Contacts.aspx" id="formTest">
</form>
Thus, URL mapping available in ASP.NET 2.0 is almost always useless. It would be much better to be able to specify a set of similar URLs in one mapping rule. The best solution is to use Regular Expressions (for overview see Wikipedia and for implementation in .NET see MSDN), but an ASP.NET 2.0 mapping does not support regular expressions. We therefore need to develop a different solution to built-in URL mapping.

The URL rewriting module 

The best way to implement a URL rewriting solution is to create reusable and easily configurable modules, so the obvious decision is to create an HTTP Module (for details on HTTP Modules see MSDN Magazine) and implement it as an individual assembly. To make this assembly as easy to use as possible, we need to implement the ability to configure the rewrite engine and specify rules in a web.config file.
During the development process we need to be able to turn the rewriting module on or off (for example if you have a bug that is difficult to catch, and which may have been caused by incorrect rewriting rules). There should, therefore, be an option in the rewriting module configuration section in web.config to turn the module on or off. So, a sample configuration section within web.config can go like this:
<rewriteModule>
  <rewriteOn>true</rewriteOn>
  <rewriteRules>
      <rule source="(\d+)/(\d+)/(\d+)/"
        
destination="Posts.aspx?Year=$1&amp;Month=$2&amp;Day=$3"/>
      <rule source="(.*)/Default.aspx"
        
destination="Default.aspx?Folder=$1"/>
  </rewriteRules>
</rewriteModule>
This means that all requests that run like: http://localhost/Web/2006/12/10/ should be internally redirected to the page Posts.aspx with query string parameters.
Please note that web.config is a well-formed XML file, and it is prohibited to use the symbol & in attribute value strings. In this case, you should use &amp; instead in the destination attribute of the rule element.
To use the rewriteModule section in the web.config file, you need to register a section name and a section handler for this section. To do this, add a configSections section to web.config:
 <configSections>
    <sectionGroup name="modulesSection">
      <section name="rewriteModule" type="RewriteModule.
RewriteModuleSectionHandler, RewriteModule
"/>
    </sectionGroup>
  </configSections>
This means you may use the following section below the configSections section:
<modulesSection>
    <rewriteModule>
      <rewriteOn>true</rewriteOn>
      <rewriteRules>
              <rule source="(\d+)/(\d+)/(\d+)/"
destination="Post.aspx?Year=$1&amp;Month=$2&amp;Day=$3"/>
              <rule source="(.*)/Default.aspx"
destination="Default.aspx?Folder=$1"/>
      </rewriteRules>
    </rewriteModule>
  </modulesSection>
Another thing we have to bear in mind during the development of the rewriting module is that it should be possible to use 'virtual' URLs with query string parameters, as shown in the following: http://www.somebloghost.com/2006/12/10/?Sort=Desc&SortBy=Date. Thus we have to develop a solution that can detect parameters passed via query string and also via virtual URL in our web application.

So, let’s start by building a new Class Library. We need to add a reference to the System.Web assembly, as we want this library to be used within an ASP.NET application and we also want to implement some web-specific functions at the same time. If we want our module to be able to read web.config, we need to add a reference to the System.Configuration assembly.

Handling the configuration section

To be able to read the configuration settings specified in web.config, we have to create a class that implements the IConfigurationSectionHandler interface (see MSDN for details). This can be seen below:
using System;
using System.Collections.Generic;
using System.Text;
using System.Configuration;
using System.Web;
using System.Xml;


namespace RewriteModule
{
    public class RewriteModuleSectionHandler : IConfigurationSectionHandler
    {

        private XmlNode _XmlSection;
        private string _RewriteBase;
        private bool _RewriteOn;

        public XmlNode XmlSection
        {
            get { return _XmlSection; }
        }

        public string RewriteBase
        {
            get { return _RewriteBase; }
        }

        public bool RewriteOn
        {
            get { return _RewriteOn; }
        }
        public object Create(object parent,
                            object configContext,
                            System.Xml.XmlNode section)
        {
            // set base path for rewriting module to
            // application root
            _RewriteBase = HttpContext.Current.Request.ApplicationPath + "/";

            // process configuration section
            // from web.config
            try
            {
                _XmlSection = section;
                _RewriteOn = Convert.ToBoolean(
                            section.SelectSingleNode("rewriteOn").InnerText);
            }
            catch (Exception ex)
            {
                throw (new Exception("Error while processing RewriteModule
configuration section."
, ex));
            }
            return this;
        }
    }
}
The Class RewriteModuleSectionHandler will be initialized by calling the Create method with the rewriteModule section of web.config passed as XmlNode. The SelectSingleNode method of the XmlNode class is used to return values for module settings.

Using parameters from rewritten URL

When handling virtual URLS such as http://www. somebloghost.com/Blogs/gaidar/?Sort=Asc (that is, a virtual URL with query string parameters), it is important that you clearly distinguish parameters that were passed via a query string from parameters that were passed as virtual directories. Using the rewriting rules specified below:
<rule source="(.*)/Default.aspx" destination="Default.aspx?Folder=$1"/>,
You can use the following URL:
http://www. somebloghost.com/gaidar/?Folder=Blogs
...and the result will be the same as if you used this URL:
http://www. somebloghost.com/Blogs/gaidar/
To resolve this issue, we have to create some kind of wrapper for 'virtual path parameters'. This could be a collection with a static method to access the current parameters set:
using System;
using System.Collections.Generic;
using System.Text;
using System.Collections.Specialized;
using System.Web;

namespace RewriteModule
{

    public class RewriteContext
    {
        // returns actual RewriteContext instance for
        // current request
        public static RewriteContext Current
        {
            get
            {
                // Look for RewriteContext instance in
                // current HttpContext. If there is no RewriteContextInfo
                // item then this means that rewrite module is turned off
                if(HttpContext.Current.Items.Contains("RewriteContextInfo"))
                    return (RewriteContext)
HttpContext.Current.Items["RewriteContextInfo"];
                else
                    return new RewriteContext();
            }
        }

        public RewriteContext()
        {
            _Params = new NameValueCollection();
            _InitialUrl = String.Empty;
        }

        public RewriteContext(NameValueCollection param, string url)
        {
            _InitialUrl = url;
            _Params = new NameValueCollection(param);
           
        }

        private NameValueCollection _Params;

        public NameValueCollection Params
        {
            get { return _Params; }
            set { _Params = value; }
        }

        private string _InitialUrl;

        public string InitialUrl
        {
            get { return _InitialUrl; }
            set { _InitialUrl = value; }
        }
    }
}
You can see from the above that it is possible to access 'virtual path parameters' via the RewriteContext.Current collection and be sure that those parameters were specified in the URL as virtual directories or pages names, and not as query string parameters.

Rewriting URLs

Now let's try some rewriting. First, we need to read rewriting rules from the web.config file. Secondly, we need to check the actual URL against the rules and, if necessary, do some rewriting so that the appropriate page is executed.
We create an HttpModule:
class RewriteModule : IHttpModule{
public void Dispose() { }
public void Init(HttpApplication context)
{}
}
When adding the RewriteModule_BeginRequest method that will process the rules against the given URL, we need to check if the given URL has query string parameters and call HttpContext.Current.RewritePath to give control over to the appropriate ASP.NET page.
using System;
using System.Collections.Generic;
using System.Text;
using System.Web;
using System.Configuration;
using System.Xml;
using System.Text.RegularExpressions;
using System.Web.UI;
using System.IO;
using System.Collections.Specialized;

namespace RewriteModule
{
    class RewriteModule : IHttpModule
    {

        public void Dispose() { }

        public void Init(HttpApplication context)
        {
            // it is necessary to
            context.BeginRequest += new EventHandler(
                 RewriteModule_BeginRequest);
        }

        void RewriteModule_BeginRequest(object sender, EventArgs e)
        {

            RewriteModuleSectionHandler cfg =
(RewriteModuleSectionHandler)
ConfigurationManager.GetSection
("modulesSection/rewriteModule");

            // module is turned off in web.config
            if (!cfg.RewriteOn) return;

            string path = HttpContext.Current.Request.Path;

            // there us nothing to process
            if (path.Length == 0) return;

            // load rewriting rules from web.config
            // and loop through rules collection until first match
            XmlNode rules = cfg.XmlSection.SelectSingleNode("rewriteRules");
            foreach (XmlNode xml in rules.SelectNodes("rule"))
            {
                try
                {
                    Regex re = new Regex(
                     cfg.RewriteBase + xml.Attributes["source"].InnerText,
                     RegexOptions.IgnoreCase);
                    Match match = re.Match(path);
                    if (match.Success)
                    {
                        path = re.Replace(
                             path,
                             xml.Attributes["destination"].InnerText);
                        if (path.Length != 0)
                        {
                            // check for QueryString parameters
                       if(HttpContext.Current.Request.QueryString.Count != 0)
                       {
                       // if there are Query String papameters
                       // then append them to current path
                       string sign = (path.IndexOf('?') == -1) ? "?" : "&";
                       path = path + sign +
                          HttpContext.Current.Request.QueryString.ToString();
                       }
                       // new path to rewrite to
                       string rew = cfg.RewriteBase + path;
                       // save original path to HttpContext for further use
                       HttpContext.Current.Items.Add(
                         "OriginalUrl",
                         HttpContext.Current.Request.RawUrl);
                       // rewrite
                       HttpContext.Current.RewritePath(rew);
                       }
                       return;
                    }
                }
                catch (Exception ex)
                {
                    throw (new Exception("Incorrect rule.", ex));
                }
            }
            return;
        }

    }
}

We must then register this method:
public void Init(HttpApplication context)
{
 context.BeginRequest += new EventHandler(RewriteModule_BeginRequest);
}
But this is just half of the road we need to go down, because the rewriting module should handle a web form's postbacks and populate a collection of 'virtual path parameters'. In the given code you will not find a part that does this task. Let's put 'virtual path parameters' aside for a moment. The main thing here is to handle postbacks correctly.
If we run the code above and look through the HTML source of the ASP.NET page for an action attribute of the form tag, we find that even a virtual URL action attribute contains a path to an actual ASP.NET page. For example, if we are using the page ~/Posts.aspx to handle requests like:

http://www. somebloghost.com/Blogs/2006/12/10/Default.aspx
,

...we find the action="/Posts.aspx". This means that the user will be using not the virtual URL on postback, but the actual one: http://www. somebloghost.com/Blog.aspx. This is not what we want to use here! So, a few more lines of code are required to achieve the desired result.
First, we must register and implement one more method in our HttpModule:
        public void Init(HttpApplication context)
        {
            // it is necessary to
            context.BeginRequest += new EventHandler(
                 RewriteModule_BeginRequest);
            context.PreRequestHandlerExecute += new EventHandler(
                 RewriteModule_PreRequestHandlerExecute);
        }

      void RewriteModule_PreRequestHandlerExecute(object sender, EventArgs e)
        {
            HttpApplication app = (HttpApplication)sender;
            if ((app.Context.CurrentHandler is Page) &&
                 app.Context.CurrentHandler != null)
            {
                Page pg = (Page)app.Context.CurrentHandler;
                pg.PreInit += new EventHandler(Page_PreInit);
            }
        }
This method checks if the user requested a normal ASP.NET page and adds a handler for the PreInit event of the page lifecycle. This is where RewriteContext will be populated with actual parameters and a second URL rewriting will be performed. The second rewriting is necessary to make ASP.NET believe it wants to use a virtual path in the action attribute of an HTML form.
void Page_PreInit(object sender, EventArgs e)
        {
            // restore internal path to original
            // this is required to handle postbacks
            if (HttpContext.Current.Items.Contains("OriginalUrl"))
            {
              string path = (string)HttpContext.Current.Items["OriginalUrl"];

              // save query string parameters to context
              RewriteContext con = new RewriteContext(
                HttpContext.Current.Request.QueryString, path);

              HttpContext.Current.Items["RewriteContextInfo"] =  con;

              if (path.IndexOf("?") == -1)
                  path += "?";
              HttpContext.Current.RewritePath(path);
            }
        }
Finally, we see three classes in our RewriteModule assembly:

Registering RewriteModule in web.config

To use RewriteModule in a web application, you should add a reference to the rewrite module assembly and register HttpModule in the web application web.config file. To register HttpModule, open the web.config file and add the following code into the system.web section:
<httpModules>
<add name="RewriteModule" type="RewriteModule.RewriteModule, RewriteModule"/>
</httpModules>

Using RewriteModule

There are a few things you should bear in mind when using RewriteModule:
  • It is impossible to use special characters in a well-formed XML document which is web.config in its nature. You should therefore use HTML-encoded symbols instead. For example, use &amp; instead of &.
  • To use relative paths in your ASPX pages, you should call the ResolveUrl method inside HTML tags: <img src="<%=ResolveUrl("~/Images/Test.jpg")%>" />. Note, that ~/ points to the root directory of a web application.
  • Bear in mind the greediness of regular expressions and put rewriting rules to web.config in order of their greediness, for instance
<rule source="Directory/(.*)/(.*)/(.*)/(.*).aspx"
destination="Directory/Item.aspx?
Source=$1&amp;Year=$2&amp;ValidTill=$3&amp;Sales=$4"/>
<rule source="Directory/(.*)/(.*)/(.*).aspx"
destination="Directory/Items.aspx?
Source=$1&amp;Year=$2&amp;ValidTill=$3"/>
<rule source="Directory/(.*)/(.*).aspx"
destination="Directory/SourceYear.aspx?
Source=$1&amp;Year=$2&amp;"/>
<rule source="Directory/(.*).aspx"
destination="Directory/Source.aspx?Source=$1"/>
  • If you would like to use RewriteModule with pages other than .aspx, you should configure IIS to map requests to pages with the desired extensions to ASP.NET runtime as described in the next section.

IIS Configuration: using RewriteModule with extensions other than .aspx

To use a rewriting module with extensions other than .aspx (for example, .html or .xml), you must configure IIS so that these file extensions are mapped to the ASP.NET engine (ASP.NET ISAPI extension). Note that to do so, you have to be logged in as an Administrator.
Open the IIS Administration console and select a virtual directory website for which you want to configure mappings.
Windows XP (IIS 5)Virtual Directory "RW"                                

Windows 2003 Server (IIS 6)
Default Web Site

Then click the Configuration… button on the Virtual Directory tab (or the Home Directory tab if you are configuring mappings for the website).
Windows XP (IIS 5)                     

Windows 2003 Server (IIS 6)

Next, click on the Add button and type in an extension. You also need to specify a path to an ASP.NET ISAPI Extension. Don't forget to uncheck the option Check that file exists.

If you would like to map all extensions to ASP.NET, then for IIS 5 on Windows XP you have only to map .* extension to the ASP.NET ISAPI extension. But for IIS 6 on Windows 2003 you have to do it in a slightly different way: click on the Insert… button instead of the Add… button, and specify a path to the ASP.NET ISAPI extension.

Conclusions

Now we have built a simple but very powerful rewriting module for ASP.NET that supports regular expressions-based URLs and page postbacks. This solution is easily implemented and gives users the ability to use short, neat URLs free of bulky Query String parameters. To start using the module, you simply have to add a reference to the RewriteModule assembly in your web application and add a few lines of code to the web.config file, whereupon you have all the power of regular expressions at your disposal to override URLs. The rewrite module is easily maintainable, because to change any 'virtual' URL you only need to edit the web.config file. If you need to test your application without the module, you can turn it off in web.config without modifying any code.
To gain a deeper insight into the rewriting module, take a look through the source code and example attached to this article. I believe you'll find using the rewriting module a far more pleasant experience, than using the native URL mapping in ASP.NET 2.0.

Sunday, 10 June 2012

Configuring PerformancePoint services in SharePoint 2010

The following are the configuration steps to get PerformancePoint up and running on SharePoint 2010 enterprise edition. 
As PerformancePoint service is integrated in SharePoint 2010 environment, we need to do some configurations in Sharepoint2010 Central Administration tool.
SP2010


It also explains what components are enabled with the Site Collection and what Site features are required for storing PPS dashboards, scorecards, and reports in SharePoint Lists and Document Libraries.
  • Starting the PerformancePoint service
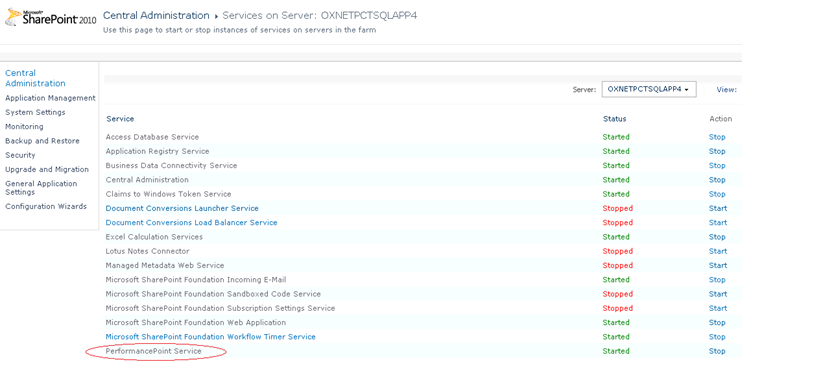
  1. Open the SharePoint 2010 central administration and click on System Settings then click on Manage services on server link under Servers category

image
You will get the following window
image
Click the start link for the PerformancePoint Service
  •  Activating PerformancePoint Site Collection Feature
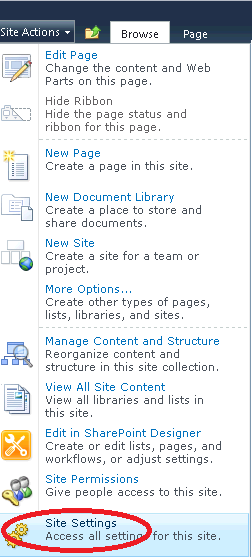
1. Open your Business Intelligence site and navigate to Site Actions and click on site settings option as shown below
image
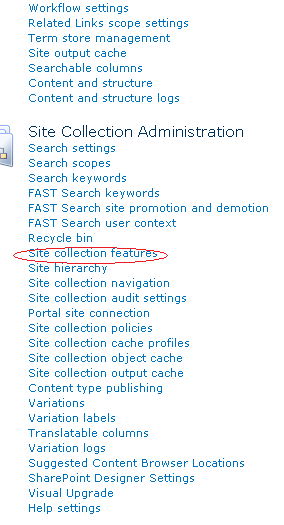
2. Click on Site Collection Features option from Site Collection Administration

image
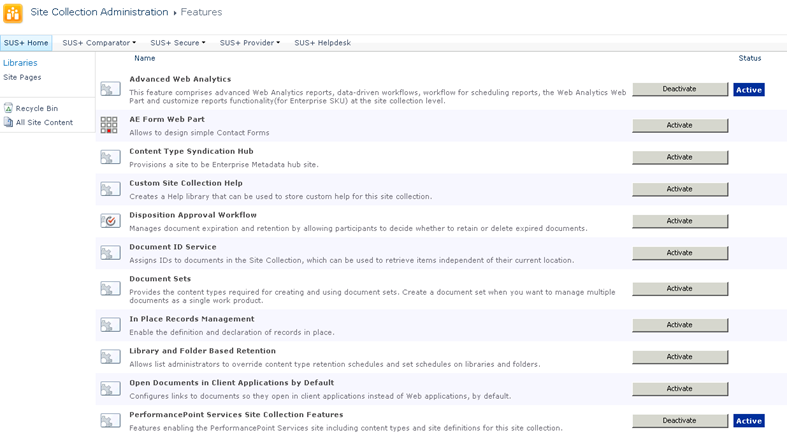
3. Activate the PerformancePoint service from the below list
image
  • Setting up the Secure Store Account
Without secure store account you cannot access the performance points unattended service account to connect to data sources. PP 2007 uses application pool identity to connect to the data sources where as in 2010 it is domain account whose password is stored in the secure store.
In order to configure Secure Store for PPS, Follow these steps
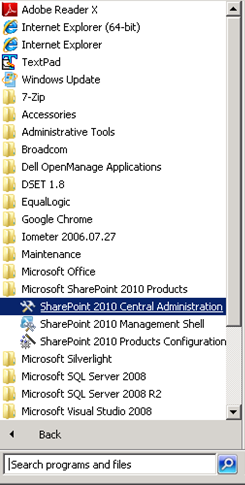
1. Open SharePoint 2010 central administration toll as shown in below
image
2. Click on Manage Service Applications under Application Management
image
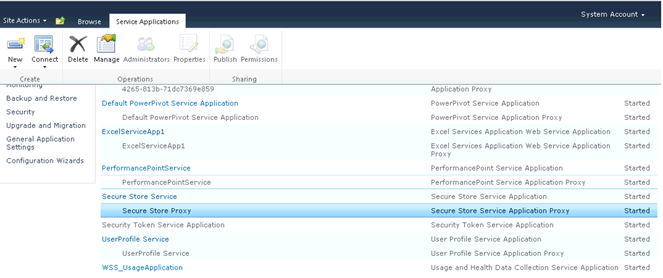
3. Click on the Secure Store Proxy and click Manage in ribbon
image
You will get a message saying ‘Generate a new key’, Click Edit on the ribbon then say Generate a new key
  •  Setting up an Unattended Service Account
1. Go to Central administration Home page
2. Click “Manage Service Applications” under application management
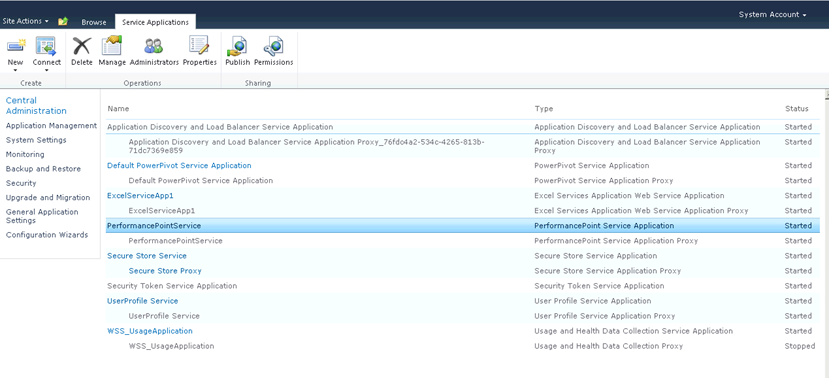
3. Click the PerformancePoint service application as shown below

image
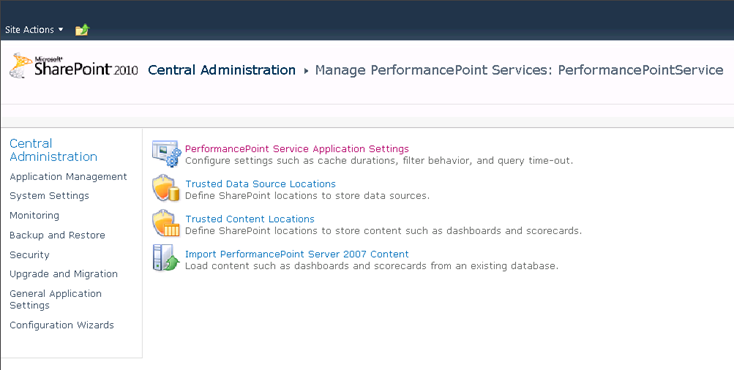
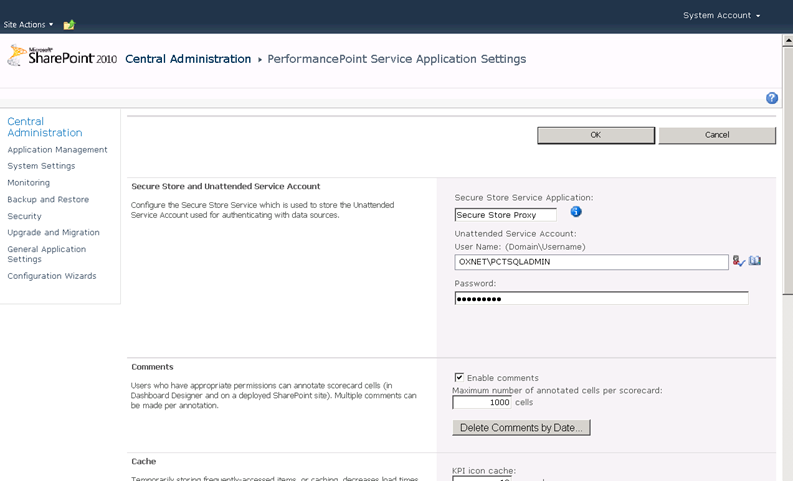
4. Click on the first link PerformancePoint Service Application Settings
image
5.In the “Unattended Service Account” section, enter the username and password for querying the data sources
image
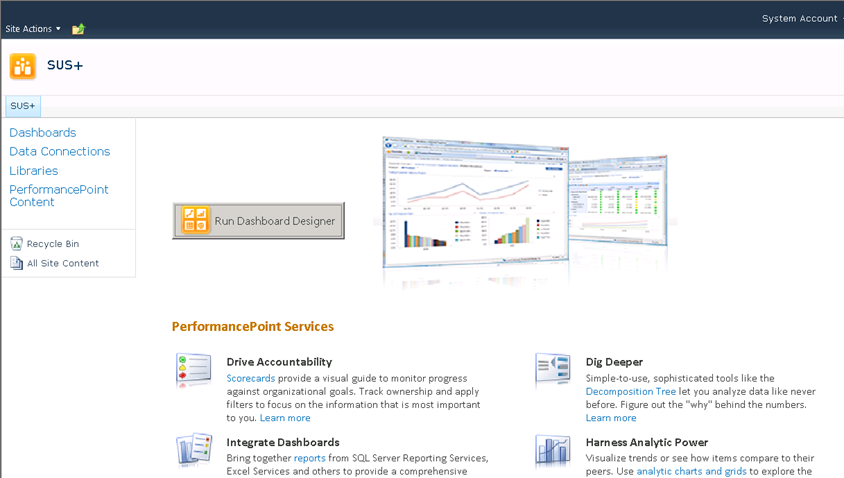
Testing the configuration of Performance Point Service, Open a Performance Point BI Center Site and Click on Run Dashboard Designer button
If you have successfully created a PerformancePoint site collection, you should be able to browse to the BI Center, launch Dashboard Designer, and connect to a data source using the unattended service account.
image

Creating a SharePoint Web Application with PowerShell

Now that we have provisioned SharePoint and added our host ‘A’ record with PowerShell, it is time to move on to creating the Web application. Prior to creating a SharePoint site collection, you must have a web application in Internet Information Services (IIS). A web application has a content database and application pool associated with it and is assigned to one of five zones: Default, Intranet, Internet, Custom, and Extranet.
You can assign a Web application to a host ‘A’ record or use your machine name. If you plan on having more than one Web application on the same URL, you must use a different port number for the web application. In a standard web application, the port number is 80 by default. In this example, we will create a new Web application using ‘lab.ps4sp.com’ on port 80. We will also use Classic Mode Authentication for the time being. We will change this as we get the farm up and running.
There are a number of advance configuration options here that will allow us to set up authentication and additional claims providers. We will take a look at these when we build a claims-aware web application.
Figure 1

The Cmdlets


New-SPWebApplication

This cmdlet creates a new Web application specified by the Name parameter. The user specified by the DatabaseCredentials parameter must be a member of the dbcreator fixed server role on the database server.
New-SPWebApplication -ApplicationPool <String> -Name <String> [-AdditionalClaimProvider <SPClaimProviderPipeBind[]>] [-AllowAnonymousAccess <SwitchParameter>] [-ApplicationPoolAccount <SPProcessAccountPipeBind>] [-AssignmentCollection <SPAssignmentCollection>] [-AuthenticationMethod <String>] [-AuthenticationProvider <SPAuthenticationProviderPipeBind[]>] [-Confirm [<SwitchParameter>]] [-DatabaseCredentials <PSCredential>] [-DatabaseName <String>] [-DatabaseServer <String>] [-HostHeader <String>] [-Path <String>] [-Port <UInt32>] [-SecureSocketsLayer <SwitchParameter>] [-ServiceApplicationProxyGroup <SPServiceApplicationProxyGroupPipeBind>] [-SignInRedirectProvider <SPTrustedIdentityTokenIssuerPipeBind>] [-SignInRedirectURL <String>] [-Url <String>] [-WhatIf [<SwitchParameter> ]] [<CommonParameters>]

The Script

Example :1
 
$siteName = “PowerShell for SharePoint”

$port = 80

$hostHeader = “lab.ps4sp.com”

$url = “http://lab.ps4sp.com”

$appPoolName = “PS4SPAppPool”

$managedAccount = “PS4SPspservice”

$dbServer = “PS-SQL”

$dbName = “PS4SP_SP2010_LAB_ContentDB”

$allowAnonymous = $true

$authenticationMethod = “NTLM”

$ssl = $false

New-SPWebApplication -Name $siteName -Port $port -HostHeader $hostHeader -URL $url -ApplicationPool $appPoolName -ApplicationPoolAccount (Get-SPManagedAccount “$managedAccount”) -DatabaseName $dbName -DatabaseServer $dbServer -AllowAnonymousAccess: $allowAnonymous -AuthenticationMethod $authenticationMethod -SecureSocketsLayer:$ssl

Example :2

  New-SPWebApplication -Name "Performance Designer" -Port 8002 -URL "http://ranjeet-pc" -ApplicationPool "Performance Designer" -ApplicationP
oolAccount (Get-SPManagedAccount "RANJEET-PC\ranjeet") -DatabaseName "wsContentd
b_8002"


Wednesday, 6 June 2012

How to Optimize SharePoint Server 2007 Web Content Management Sites for Search Engines

Search Engine Optimizations

Search engine optimization is the process of optimizing sites and pages for search engines to result in better relevance and ranking for the site. The standard best practices or rules for search engine optimization that you might apply for Web pages are equally relevant and important for Web content management (WCM) sites you develop in Microsoft Office SharePoint Server 2007. A page or site that is not optimized properly for search engines can appear much lower is the search results or have lower rank, which can result in loss of traffic to the site. A site or page that is better optimized for search engines appears higher in the search results and will help increase traffic to your site.

This article does not address how to configure Enterprise Search in Microsoft Office SharePoint Server 2007.

Improvements for Ranking

You can improve the ranking of documents on your WCM sites in the following ways:
  • Include keywords, key phrases, and a description that reflects the page’s content.

  • Use the Robots Exclusion Standard, for example, robots.txt (see About /robots.txt).

  • Place your content as high up in the page (HTML) as possible to get it more relevance. A typical page has a lot of content (HTML) and code (ECMAScript—JScript or JavaScript—or XML) in it, and this mix of content and code can affect how a search engine processes the page.

  • Use proper semantic code (appropriate HTML elements) such as headlines. For example, use headline elements tagged as <h1> to <h6>. Use proper HTML list items; for example, ordered, unordered, or definition lists tagged with <ol>, <ul>, or <dl> tags. Use alt and title attributes with image (<img>) tags. Use a Favorites icon for bookmarking and to keep your error log clean. For more information, see How to Add a Shortcut Icon to a Web Page.

  • Use the Platform for Internet Content Selection (PICS) specification (see W3C and ICRA tools) to provide a signal to search engines and filter programs that your Web site is safe for children.

  • Consider keyword density. Because of a general misuse of HTML keyword <meta> tags, current crawlers compare the number of times a word or a phrase appears in an HTML page to the number of times it appears in its <meta> tag to properly determine its relevancy. Using too few or too many keywords can have a negative effect.

  • Use descriptive text in your hyperlinks.

  • Consider the levels of directories or subsites in a path to a Web page, or the URL depth.

  • Use descriptive page titles.

  • Build some automated process in Office SharePoint Server 2007 to create or update the sitemap file for a WCM site. The sitemap file is a simple XML file that contains URLs for the site’s pages and some metadata to help search engines crawl or discover pages in a site (for more information, see What are Sitemaps?). You can achieve this by using custom workflows or by customizing a default SharePoint publishing workflow.

  • Use valid HTML or XHTML. Even if most ASP.NET 2.0 controls are XHTML-compliant, Office SharePoint Server 2007 and SharePoint controls are not XHTML-compliant. However, considering XHTML when you are designing master pages and page layouts will always help. If you need to get compliant output from controls that are not compliant, you can refer to Scott Guthrie's article CSS Control Adapter Toolkit for ASP.NET 2.0 for possible options. You can also code all custom Web Parts and field controls to be XHTML-compliant.

Practices to Avoid

Try to avoid doing the following in the Web pages for your WCM site:
  • Naming all pages in the site with the same page title.

  • Including a specific keyword or keywords or a phrase too often in the <meta> tags or content of a Web page, also called keyword stuffing. In this scenario, the crawler might determine that these keywords or phrases are suspect, and they might be discarded when the search engine is calculating relevance.

  • Using hidden text to fill a page with keywords that a search engine can recognize but that are not visible to a visitor.

  • Using complex URLs, in which a page is multiple levels deep in a site (for example, http://someserver.com/subsite/pages/somepage.aspx) might not be easily crawled. You can use a combination of a URL rewriter and a sitemap file to address this in Office SharePoint Server. In addition, this unwanted behavior on the part of the crawler highlights the importance of using proper site structure (which is part of the information architecture).

  • Using temporary redirects (this can be a significant issue with a SharePoint landing page). For more information, see Welcome Page Redirect.

  • Using complex pages. Take care to keep the pages in a SharePoint site simple, minimizing the use of items such as inline styles or ECMAScript (JScript, JavaScript). The more elements that a page contains, the more difficult it can be for the crawlers to process the page properly.

Search Visibility in SharePoint Server

By default, the setting for search visibility is on. However, you can set the options for search visibility to "no", which will exclude that site from search results. control what is crawled (and not crawled) on your site. To exclude the site from third–party search engines or crawlers, add <noindex> and <nofollow> <meta> tags in the master page or by using the MetaTagsGenerator control, available on the SharePoint 2007 WCM Utilities page on CodePlex.


Figure 1. Setting search visibility options

Setting search visibility options

Welcome Page Redirect

The landing page or welcome page in Office SharePoint Server 2007 is a 302 redirect page. This can cause problems, as pages with temporary redirects can affect the page’s ranking adversely. If you must use redirection, it is always a better to use 301 permanent redirects. Unfortunately, it is not possible to change this behavior in Office SharePoint Server; however, you can use any URL rewriter and make your welcome or landing page a permanent redirect.
Following is a sample HTTPModule that you can add to the Office SharePoint Server application to handle 302 redirects for the top-level Web site (root) site collection. You must write more complex conditions to handle subsites, and additional code to discover landing or welcome pages for subsites.
If you use a URL rewriter, you need to add only a line to the web.config file for each subsite.

To create the HTTPModule

  1. Create a class library project named MOSSRedirectModule1.
  2. Add the following code to a new class named HTTPModule.cs.


    using System;
    using System.Collections;
    using System.Web;
    using Microsoft.SharePoint;
    using Microsoft.SharePoint.Publishing;
    namespace MOSSRedirectModule
    {
       public class HttpModule : System.Web.IHttpModule {
          /// <summary>
          /// Initializes an instance of this class.
          /// </summary>
          public HttpModule() {      }
          /// <summary>
          /// Disposes of any resources used.
          /// </summary>
          public void Dispose() {      }
          /// <summary>
          /// Initializes the module by hooking the application's BeginRequest event.
          /// </summary>
          /// <param name="context">The HttpApplication this module is bound to.
    </param>
          public void Init(System.Web.HttpApplication context) {
             context.BeginRequest += new EventHandler(context_BeginRequest);
          }
    
          void context_BeginRequest(object sender, EventArgs e) {
             HttpRequest Request = HttpContext.Current.Request;
             HttpResponse Response = HttpContext.Current.Response;
             String ResponsePath = null;
             if (Request.Url.OriginalString == "http://server:port/")
    //Replace with code to read server from web.config.
                {
                    SPSecurity.RunWithElevatedPrivileges(delegate() {
                    SPSite siteCollection = new SPSite("http:// server:port/");
                       SPWeb rootWebSite = siteCollection.RootWeb;
                       SPWeb webSite = siteCollection.OpenWeb();
                       PublishingWeb PubWeb = PublishingWeb.GetPublishingWeb(webSite);
                       ResponsePath = PubWeb.DefaultPage.Name;
                    });
                    RedirectPermanent("http://server:port/Pages/" + ResponsePath);
             }
          }
    
          private void RedirectPermanent(string ResponsePath) {
             if (!String.IsNullOrEmpty(ResponsePath)) {
                HttpResponse Response = HttpContext.Current.Response;
                Response.StatusCode = 301;
                Response.StatusDescription = "Moved Permanently(1)";
                Response.RedirectLocation = ResponsePath;
                Response.Write("html");
                Response.End();
             }
          }
       }
    }
     

To configure the HTTPModule

  1. Copy the MOSSRedirectModule DLL to the app_bin directory of the application or to the global assembly cache. You must give the DLL a strong name before you can add it to the global assembly cache. For more information, see Signing an Assembly with a Strong Name.
  2. Add the following tags to the web.config file for every front-end Web server in the farm.
     
    <compilation batch="false" debug="false">
        <assemblies>
    <add assembly="MOSSRedirectModule, Version=1.0.0.0, Culture=neutral, 
    PublicKeyToken=xxxxxx"/>
        </assemblies>
    </compilation>
    <httpModules>
        <clear />
    <add name="HttpModule" type="MOSSRedirectModule.HttpModule" />
    </httpModules>
    
After you finish these steps, you can use a tool such as Fiddler to verify whether the module is working properly.

<Meta> Tags

There are a few page properties which can affect how your page ranks in a search engine. When you create a page, you can set Title and Description properties that appear on the final page as <Description> and <title> <meta> tags, described earlier in this document.
Missing in Office SharePoint Server is the ability to add any other custom tag, such as Keywords, by default. You can achieve the same goal by using the MetaTagsGenerator control, available on the SharePoint 2007 WCM Utilities page on CodePlex. Keywords no longer play as important a role in relevance because of the extensive misuse of this approach by webmasters, and the modern crawler looks at options such as keyword density to calculate relevance. Most crawlers ignore the <keywords> tag completely.


Figure 2. Set Title and Description properties

Set Title and Description properties

Enterprise Search in SharePoint Server for an Internet-Facing WCM Site

You should be aware of a few things when configuring Enterprise Search in Microsoft Office SharePoint Server 2007. One consideration is that it will take some amount of work to configure Enterprise Search to work with forms authentication sites. You must extend the site and configure Integrated Windows authentication, as the search crawler needs Integrated Windows authentication to work. The default authentication should be Integrated Windows authentication, and the extended zone should be forms authentication. Office SharePoint Server can change the URL port to show the correct URL when content is crawled by using Windows authorization, and is searched from a forms authentication-extended site. For example, if you crawl a site such as http://someserver:81, and then try to search the content for the site from a forms authentication extended site such as http://someserver:82, the results will show port 82, not 81.
It is possible to crawl forms authentication sites with Microsoft Office SharePoint Server Service Pack 1 (SP1); however, it is a simple crawl that does not provide any security or rich metadata information. For more information, see Prepare to Crawl Host-Named Sites that Use Forms Authentication, and "Crawling Content" in Forms Authentication in SharePoint Products and Technologies (Part 3): Forms Authentication vs. Windows Authentication.

Conclusion

With the increase in popularity of Microsoft Office SharePoint Server 2007 as a platform for Internet-facing sites, it has become very important to optimize Web pages and sites for search engines. Office SharePoint Server 2007 provides many options to craft and adjust pages to facilitate crawling, but you need focused effort and awareness to do the right things in the right way. Otherwise, you can affect a site's rankings adversely, and impact the success of the site. By implementing the tips for search engine optimization presented in this article, you can improve a site's ranking in search results.

Creating Timer Jobs in SharePoint 2010

Microsoft SharePoint 2010 timer jobs perform much of the back-end work that is required to maintain your SharePoint farm. Timer jobs are executable tasks that run on one or more servers at a scheduled time. They can be configured to run exactly one time, or on a recurring schedule. They are similar to Microsoft SQL Server Agent jobs, which maintain a SQL Server installation by backing up databases, defragmenting database files, and updating database statistics. SharePoint uses timer jobs to maintain long-running workflows, to clean up old sites and logs, and to monitor the farm for problems. Depending on your edition of SharePoint and any installed third-party products, you can have many timer jobs in your farm, or just a few. Timer jobs have several advantages. They can run periodically and independently of users who are accessing your SharePoint sites, they can offload long-running processes from your web front-end servers (which increases the performance and responsiveness of your pages), and they can run code under higher privileges than the code in your SharePoint site and application pages.
You can view the timer jobs in your farm by using the Job Definitions page in SharePoint 2010 Central Administration. To access the Job Definitions page, click All Programs, Microsoft SharePoint 2010 Products, SharePoint 2010 Central Administration. On the Central Administration site, click the Monitoring link. Finally, click the Review Job Definitions link in the Timer Jobs section of the Monitoring page. The list of timer job definitions in your farm is displayed, as shown in Figure 1.


Figure 1. List of SharePoint timer job definitions

List of SharePoint timer job definitions
Because SharePoint timer jobs run in the background, they perform their tasks behind the scenes, even if no users are accessing your SharePoint sites. The Windows SharePoint Services Timer service runs the timer jobs in your farm. The service must be enabled and running on each server in your farm. The service enables the various SharePoint timer jobs to configure and maintain the servers in the farm. If you stop the Windows SharePoint Services Timer service on a server, you also stop all SharePoint timer jobs running on that server; for example, jobs that index your SharePoint sites, import users from Active Directory, and perform many other processes that affect the performance and usability of SharePoint.

Preparing to Create a SharePoint Timer Job

Before you can create your SharePoint timer job, you must install Microsoft Visual Studio 2010 (Professional, Premium, or Ultimate edition) on Windows Vista, Windows 7, or Windows Server 2008. SharePoint 2010 must be installed on the development computer.
After you install the required software, create a new SharePoint project in Visual Studio by selecting File, New, Project, which displays the New Project dialog box, shown in Figure 2. In the dialog box, ensure that .NET Framework 3.5 is selected in the drop-down list at the top of the dialog box, and expand the list of project templates in the left pane of the dialog box until 2010 is displayed under SharePoint. Select 2010 to display a list of SharePoint 2010 project templates in the right pane of the dialog box. Select Empty SharePoint Project from the list of templates, specify the project information at the bottom of the dialog box, and then click OK. You use the new project to develop your new timer job, package it for deployment to SharePoint, and then debug it.


Figure 2. New Project dialog box

New Project dialog box
note Note:
Your New Project dialog box might seem to be different from the dialog box shown in Figure 2, depending on your Visual Studio configuration.

Immediately after you click OK in the New Project dialog box, the SharePoint Customization Wizard dialog box appears, as shown in Figure 3. Type the URL of your SharePoint site in the text box, select Deploy as a farm solution, and then click Finish. You must select the Deploy as a farm solution radio button because timer jobs require a higher level of trust to execute than sandboxed solutions.


Figure 3. SharePoint Customization Wizard dialog box

SharePoint Customization Wizard dialog box
After you click Finish in the SharePoint Customization Wizard dialog box, Visual Studio creates and opens the project, as shown in Figure 4. Now that the project is created, you can start adding the classes that are required to form the basis of your SharePoint timer job. The next section outlines how to create those classes.


Figure 4. New SharePoint project open in Visual Studio

New SharePoint project open in Visual Studio

Creating a SharePoint Timer Job

All timer jobs, including those installed with SharePoint, are created and executed by using the SPJobDefinition class. To create a new SharePoint timer job, you must first add a class to your project that inherits from the SPJobDefinition class.

To add the class to your project

  1. Right-click the project and then choose Add, Class from the context menu to open the Add New Item dialog box.
  2. Specify a name for the class, and then click Add. Visual Studio opens the new class in the text editor.
  3. Change the visibility of the class to public, and make the class inherit from the SPJobDefinition class.
The following code snippet shows an example of a class that inherits from the SPJobDefinition class.
using System;
using System.Collections.Generic;
using System.Linq;
using System.Text;
using Microsoft.SharePoint.Administration;
using Microsoft.SharePoint;

namespace MonitoringJob {
    public class MonitoringJob : SPJobDefinition {
        public MonitoringJob() : base() { }

        public MonitoringJob(string jobName, SPService service)
            : base(jobName, service, null, SPJobLockType.None) {
            this.Title = jobName;
        }

        public override void Execute(Guid targetInstanceId) {
            // Put your job's code here.
        }
    }
}
In the code snippet, the MonitoringJob class inherits from the SPJobDefinition class, defines one non-default constructor, and overrides the Execute method of the base class. The non-default constructor is required because the default constructor of the SPJobDefinition class is for internal use only. When you create your constructor, you must pass the values for the four parameters described in Table 1 to the base class constructor.

Table 1. Parameters for the SPJobDefintion constructor

Name Description
name The name of the job.
service An instance of the SPService class that owns this job. Only the servers where the service, represented by the SPService object, is running can run this job.
server An instance of the SPServer class associated with this job. Pass null if this job is not associated with a specific server.
lockType An SPJobLockType value that indicates the circumstances under which multiple instances of the job can be run simultaneously.
In the preceding code snippet, null is passed as the value for server because this job is not associated with a specific server. SPJobLockType.None is passed as the value for lockType to enable SharePoint to run multiple instances of the job simultaneously. Table 2 lists the possible SPJobLockType values and their descriptions.

Table 2. SPJobLockType values

Value Description
None Locking is disabled. Job runs on all servers in the farm unless you pass an SPServer object for the server parameter.
ContentDatabase Job runs for each content database associated with the job's web application.
Job Only one server can run the job at a time.
After you create the constructors, you must override the Execute method of the SPJobDefinition class and replace the code in that method with the code that your job requires. If your code can run without further configuration, you are finished creating this class. Otherwise, you must add configuration screens and classes to your project, as shown in the next section. The next section also discusses the actual code from the sample that belongs in the Execute method.

Enabling Configuration for Your SharePoint Timer Job

To store configuration data for the job, create classes to contain that configuration and store it in SharePoint. First, the class must inherit from the SPPersistedObject class. Next, the fields in the class must be public, marked with the [Persisted] attribute, and have a data type that is either built-in (Guid, int, string, and so on), inherits from SPAutoSerializingObject, or is a collection type that contains one of the built-in types or a type inheriting from SPAutoSerializingObject. Only fields are saved, not properties, as you might be used to when you serialize objects to XML. The following code snippet shows the two classes that are used to configure the MonitoringJob class.
using Microsoft.SharePoint.Administration;
public class MonitoringJobSettings : SPPersistedObject {
    public static string SettingsName = "MonitoringJobSettings";

    public MonitoringJobSettings() { }
    public MonitoringJobSettings(SPPersistedObject parent, Guid id) :
        base(SettingsName, parent, id) { }

    [Persisted]
    public string EmailAddress;
}
In the code snippet, the MonitoringJobSettings class is used to configure the MonitoringJob class. It inherits from SPPersistedObject and has a single field named EmailAddress that is marked with the [Persisted] attribute. The EmailAddress field is used for the recipient of emails that are sent.
One detail to note is that the MonitoringJobSettings class has two constructors defined; a default constructor, which is required for all serializable classes, and a second constructor that calls a constructor on its base class. This second constructor passes in the name of the SPPersistedObject, an instance of an SPPersistedObject that acts as the "parent" of the MonitoringJobSettings object, and a Guid that is used to assign it a unique identifier in SharePoint. Because MonitoringJob is associated with a specific SPService object, the same SPService object becomes the parent of the MonitoringJobSettings object when it is saved to SharePoint. There is more information about how this works later in this section.
After you create the classes for the job and its configuration, you can use the following code snippet to save the configuration of the job to SharePoint. Later, you add this code to an event handler that executes when the feature that contains your timer job is activated.
// Get an instance of the SharePoint Farm.
SPFarm farm = SPFarm.Local;

// Get an instance of the service.
var results = from s in farm.Services
    where s.Name == "SPSearch4"
    select s;

SPService service = results.First();

// Configure the job.
MonitoringJobSettings jobSettings = new MonitoringJobSettings(service, 
    Guid.NewGuid());
jobSettings.EmailAddress = "myemail@demo.com";
jobSettings.Update(true);
In the code snippet, a reference to the SPService object that represents the SharePoint Search service is obtained and passed to the constructor of the MonitoringJobSettings class together with a unique Guid. After that, the EmailAddress property of the class is configured, and the class's Update method is called to persist the object to SharePoint. Passing true to the Update method specifies that you want SharePoint to overwrite any existing saved configuration. Otherwise, an exception is thrown.
To retrieve your configuration, get an instance of the SPService, call its GetChild method, and then pass in the class type that you are retrieving, together with the name of the setting. The following code snippet shows part of the implementation of the Execute method of the SPJobDefinition-derived class.
public override void Execute(Guid targetInstanceId) {
    MonitoringJobSettings jobSettings =
        this.Service.GetChild<MonitoringJobSettings>(
            MonitoringJobSettings.SettingsName);

    if (jobSettings == null) {
        return;
    }

    // Code omitted.
}
The MonitoringJobSettings class was retrieved from SharePoint by calling the GetChild method of the job's parent SPService object. If nothing was previously saved to SharePoint, the call to the GetChild method returns null . After you have an instance of your job's configuration, the rest of the code in your Execute method can run.

Deploying Your Timer Job

Now that you have created the job and configuration classes, you must add a SharePoint Feature to enable your SharePoint administrators to use the functionality in SharePoint. A SharePoint Feature is a set of provisioning instructions written in XML that tell SharePoint what to do when the feature is activated. You can see a list of example features by clicking the Site Features or Site Collection Features link on the Site Settings page of your site.

To add a feature to your project

  1. Right-click the Features folder and choose Add Feature from the context menu.


    Figure 5. New feature added

    New feature added
  2. Type a user-friendly title and description in the top two text boxes. The values that you specify for the title and the description are displayed on the Web Application Features page in SharePoint Central Administration.
  3. Because this feature registers the job with one of the web applications in your farm, set Scope to WebApplication.
  4. Click the Save button in the toolbar.
Now that you have created and configured the feature, you must add an event receiver to the feature so that you can add the code that is required to register your job. An event receiver is a class that runs code when certain events occur in SharePoint. In this case, you add an event receiver to run code when the feature is activated or deactivated. To add an event receiver, right-click your feature and then choose Add Event Receiver from the context menu.
After you add the event receiver, you must uncomment the FeatureActivated and FeatureDeactivating methods. You can remove the other methods because they are not used. Next, you must add code in the FeatureActivated method to register the job with SharePoint. Finally, you add code in the FeatureDeactivating method to unregister the job. The following code example shows how to register and unregister the MonitoringJob object.
public override void FeatureActivated(
    SPFeatureReceiverProperties properties) {

    // Get an instance of the SharePoint farm.
    SPFarm farm = SPFarm.Local;

    // Get an instance of the service.
    var results = from s in farm.Services
                  where s.Name == "SPSearch4"
                  select s;

    SPService service = results.First();

    // Remove job if it exists.
    DeleteJobAndSettings(service);

    // Create the job.
    MonitoringJob job = new MonitoringJob(
        MonitoringJob.JobName, service);

    // Create the schedule so that the job runs hourly, sometime 
    // during the first quarter of the hour.
    SPHourlySchedule schedule = new SPHourlySchedule();
    schedule.BeginMinute = 0;
    schedule.EndMinute = 15;
    job.Update();

    // Configure the job.
    MonitoringJobSettings jobSettings = new MonitoringJobSettings(
        service, Guid.NewGuid());
    jobSettings.EmailAddress = "myemail@demo.com";
    jobSettings.Update(true);
}

public override void FeatureDeactivating(
    SPFeatureReceiverProperties properties) {

    // Get an instance of the SharePoint farm.
    SPFarm farm = SPFarm.Local;

    // Get an instance of the service.
    var results = from s in farm.Services
                  where s.Name == "SPSearch4"
                  select s;

    SPService service = results.First();

    DeleteJobAndSettings(service);
}

private void DeleteJobAndSettings(SPService service) {
    // Find the job and delete it.
    foreach (SPJobDefinition job in service.JobDefinitions) {
        if (job.Name == MonitoringJob.JobName) {
            job.Delete();
            break;
        }
    }

    // Delete the job's settings.
    MonitoringJobSettings jobSettings =
        service.GetChild<MonitoringJobSettings>(
            MonitoringJobSettings.SettingsName);
    if (jobSettings != null) {
        jobSettings.Delete();
    }
}
In the preceding code example, the FeatureActivated method gets an instance of the SPFarm object by accessing the local static property of the SPFarm class. After that, the SPFarm class's Services property is enumerated to obtain an SPService instance to represent the SharePoint Search service.
Next the FeatureActivated method calls the DeleteJobAndSettings method to remove the job if it already exists. The job might already exist if the feature was previously deployed, but experienced a problem during deactivation. Afterwards, an instance of the job definition is created by passing in the name of the job and an instance of the SPService class. After the job is created, you must set its Schedule property to an instance of the one of the SPSchedule classes described in Table 3.

Table 3. SPSchedule class types

Type Description
SPMinuteSchedule Runs the job every x number of minutes. This class can be used to schedule jobs for periods of time other than hour, day, week, month, or year. For example, to run a job every 11 days, use this class and set its Interval property to 15840 minutes.
SPHourlySchedule Runs the job every hour.
SPDailySchedule Runs the job daily.
SPWeeklySchedule Runs the job weekly.
SPMonthlySchedule Runs the job monthly.
SPYearlySchedule Runs the job yearly.
In the preceding code example, the SPHourlySchedule class is used to run the job every hour. The properties that begin with Begin and End specify the earliest and latest time, respectively, that the job can start. The Timer service randomly selects a time during that interval to start the job. After you set the Schedule property of your job, call the Update method of the job to register it with SharePoint. The final step in the method is to create an instance of the MonitoringJobSettings class, set its properties, and then save it by calling its Update method.
In the FeatureDeactivating method, the DeleteJobAndSettings method is called to delete the previously registered job. The DeleteJobAndSettings method uses the JobDefinitions property to get a list of the jobs registered for that SPService object and deletes the job the feature previously created. The method also gets the job's configuration and deletes it.
At this point, you are ready to test your code. In the next section, you learn how to test and debug your SharePoint job.

Testing and Debugging Your SharePoint Timer Job

When you debug SharePoint code, you typically set the build type of the project to debug, and then press F5 to debug the project. Visual Studio compiles your code, packages the resulting assembly and XML files into a SharePoint solution package (.wsp) file, and then deploys the solution package to SharePoint. After the solution package is deployed, Visual Studio activates the features that you created.

To debug the timer job

  1. To debug a timer job in SharePoint, you must attach to the process that is behind the SharePoint Timer Service. To attach to the SharePoint Timer Service, select Debug and then choose Attach To Process from the menu bar.
  2. In the Attach To Process dialog box, make sure that the check boxes at the bottom of the dialog box are both checked, and then select OWSTIMER.EXE from the Available Processes list.


    Figure 6. Attach To Process dialog box

    Attach To Process dialog box
  3. Click Attach to finish attaching to the SharePoint Timer Service.
    Now you can add breakpoints in your job code.
To make the job run immediately, you can issue a Windows PowerShell command that causes the SharePoint Timer Service to run your job immediately. To open Windows PowerShell, click All Programs, click Microsoft SharePoint 2010 Products, and then choose SharePoint 2010 Management Shell.
The Windows PowerShell console opens with the SharePoint namespaces already registered. Type the following command on one line, and then press Enter to schedule your job for immediate execution.
Get-SPTimerJob "jobname" -WebApplication "url" | Start-SPTimerJob
In the command line, jobname is the name of your project and url is the URL of your web application. The Get-SPTimerJob command gets the job definition for your job, and the pipe (|) sends the job definition to the Start-SPTimerJob command, which in turn schedules it to run. The SharePoint Timer Service usually takes less than 30 seconds to finish running. If it does not execute, make sure that the debugger is not paused in Visual Studio.

Conclusion

Timer jobs give you the flexibility to offload your long-running or scheduled processes from your Internet Information Services (IIS) sites. Timer jobs are powerful because they can be configured to run on a specific schedule and can include any functionality that you must have to create world-class, SharePoint-based solutions for your enterprise.